
This is the third in a three-post series about the RateYourSeats.com team's experience using Ionic and AngularJS to build the T!ckets app.
Steve Calhoun will share his thoughts on the AngularJS mindset, Ionic gestures, layering touch behaviors and customized browsers.
----
Developer Introduction: Steve Calhoun
Prior to joining the RateYourSeats team in 2012, the extent of my programming experience was mostly in writing VBA macros for use within Excel workbooks. Sure I had taken a few programming classes in college, but being 10 years removed from any traditional coding education meant that I'd have to learn everything completely from scratch when I signed on with Keith. Looking back on the past 4 years, its been a series of daily adventures learning more and more with every project we work on, and developing the T!ckets™ app was one the most challenging and rewarding to date.
Over the course of our work at RateYourSeats, I've taken on the responsibility of overseeing the code that powers our interactive seating charts. The majority of the content below focuses on the particular challenges I experienced while creating the seating charts within our app, but can be applicable in many other areas. You'll see how truly inexperienced I was to the entire Ionic Framework and AngularJS, something which should give any programmer a good deal of hope in developing their own app.
Build with Angular in Mind
It was a big question mark as to whether our conventional method of drawing a seating chart using shapes within an SVG parent element would translate to the Ionic Framework. Not only was I unsure of whether all the elements would render properly, but I first had to figure out how to get it rolling within our new stack of Ionic and AngularJS.
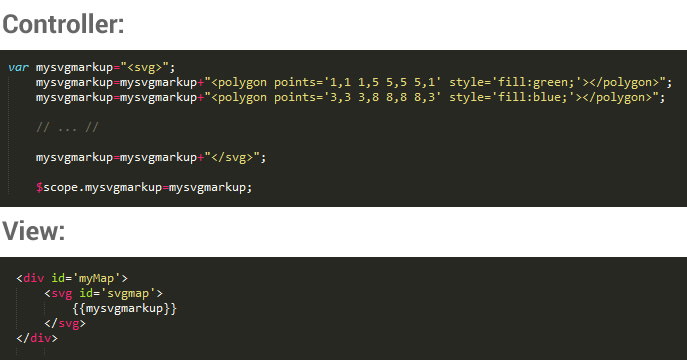
Injecting Markup: Static and Unsuccessful
Anxious to see whether we'd be in good shape or going back to the drawing board, my first attempt at an SVG map was hasty at best as I fell back on our traditional process of generating every piece of markup needed in a query to our server. I stored the markup in an Angular scope variable and then tried to inject it within the view, but was not surprised when this didn't work at all. It shouldn't be this easy, and even if it had been, I wouldn't be able to take advantage of AngularJS with the ability to manipulate desired map elements through the controller. So this was lesson number one for me: Learn to use AngularJS as it was intended to be used.
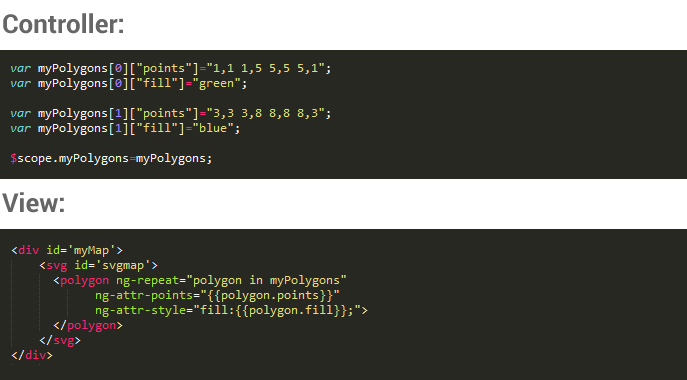
A More Dynamic and Far More Angular Approach: ng-repeat
After reading up and getting a little better understanding of Angular, my next attempt was far more methodical and most importantly, successful. Rather than just placing markup within the view, I created a set of loops using Angular's ng-repeat which would draw the individual paths, text elements, and markers which we needed. The server query was able to get a much needed cleaning, returning a trimmed down array of attributes which feed through the ng-repeat loops instead of just a big, clumsy, static block of markup. We were now less taxing on data queries, quicker to load the map, and most importantly, we had all our SVG paths showing up as desired on our mobile app!
Its easy for me to fall back into habits that have proven successful in the past, wanting to capitalize on previous knowledge that has been battle tested (which is exactly what I did when I first attempted an injection of static markup). But this was certainly a time when it was far more beneficial to go slow and design with the controller vs. view (Angular) model at the very front of mind. Moving forward my development was always conceptualized beginning in the controller, and then having the view in place to respond accordingly.
UPDATE: Rendering Background Images Within a SVG
One component to our maps which still needed to be solved was the inclusion of a background image inside the SVG. The image code was getting placed in the view as expected, but the image itself would not render (this was perplexing as images were showing up just fine in other elements of the view - but not within the SVG). After quite a bit of time researching the issue, I found that including a trusted resource filter did the trick: External Resources Not Being Loaded by AngularJS
Developing Your Own Touch Responses: $ionicGestures Service
For many Ionic applications, zooming and panning across an element can be easily accomplished with the help of the ion-scroll directive. You can drag and swipe to different areas with the element (horizontally, vertically, and diagonally), and it also features a slick acceleration recognition which will continue the action even after your touch event ends (if it was deemed to be fast enough). And while this would have been a great plug and play addition to our app, we needed the ability to calculate the current viewable area to determine which elements on the map should show and which are safe to hide.
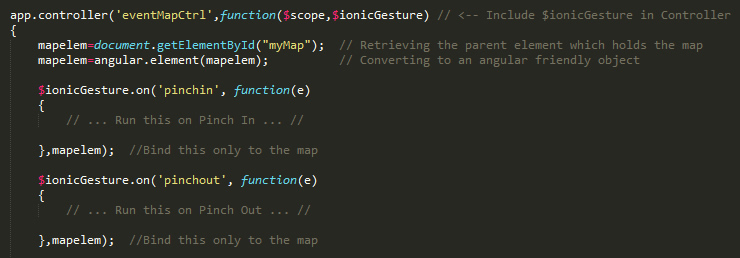
This left us to design our own touch gestures for interacting with the map: pinching to zoom in/out, and dragging to pan the map. Unsure of the best way to accomplish our own touch gesture behavior, we tried a few different approaches before coming across the final solution which was the $ionicGestures service. By bringing the $ionicGestures variable into the controller, you can attach a number of different events to a desired element.
Touch Response Issues On Android KitKat
The responses tested great for Android on my Moto X, and iOS was more of the same testing beautifully on both an iPhone 4 and iPhone 5. But we ran into one of the biggest roadblocks for the map build when we discovered that the gestures were not firing correctly on Keith's Droid Maxx.
No matter how far the drag, the map would move only 1 pixel for Keith. Pinching to zoom yielded a very similar result, only a slightly noticeable reaction to a gesture. In spite of a recent phone drop that left the screen resembling a spider web, it didn't seem to be a hardware issue as gestures were firing just fine for other applications.
After taking to the message boards once again to hunt down the problem, I was incredibly relieved to find that others had encountered this very same challenge - all of which was pointing at KitKat (Android v4.4). This made a great deal of sense as my Moto X had updated itself to Lollipop (Android v5.1) while Keith's Maxx was still running KitKat, thus explaining why I was seeing different results in my Android testing.

Preventing Default Action Comes to the Rescue
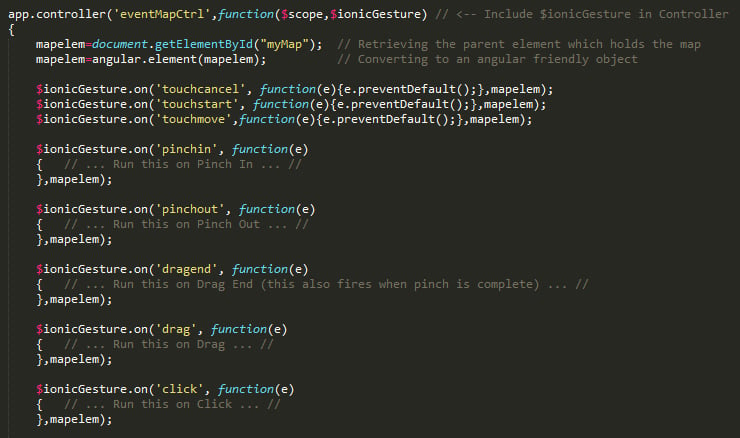
There are some great threads which discuss the issue further (see below), but in summary, it turns out that we needed to be prepared for when and how Android 4.4 fires the touchcancel event. Unlike other the environments in which we were testing, Android 4.4 throws a touchcancel almost immediately following a touchstart or touchmove event if you don't have a catch in place to stop it from performing the default action (which we didn't).
Therefore, when Keith tried to begin a drag (which also gets registered as a touchstart), the touchcancel would in turn fire nearly right afterward and the phone assumed we were done with that gesture (see animated image above for a demonstration). After a ton of headache and stress, the fix was just a few simple lines of code:

Helpful links regarding the touchcancel event on Android 4.4:
https://github.com/driftyco/ionic/issues/2115
https://github.com/driftyco/ionic/issues/1729
https://developer.android.com/guide/webapps/migrat...
Bind Only Where Needed - Potential Conflicts
Its important to note that some developers commented that implementing the prevent default on the touchstart and touchmove events ended up breaking the scroll behavior across their entire apps. We didn't experience this complication as our catches were bound only to the element which holds our map (see mapelem in the code image above). So just be careful that you only attach the fix where needed, otherwise you might run into some odd behavior in other areas.
Final Suite of Custom Touch Responses
With our Android 4.4 fix now in place, we were looking good with basic map interaction using touch gestures across our different test environments. We had the ionicGesutre service working with the drag event to control the panning of the map, pinchin and pinchout to control our zoom, and dragend to determine when either a pan or zoom had been completed by the user.
I won't go in depth here on how exactly the dragging and pinching events manipulate the viewport on the SVG map, but if you're interested in finding out how it works or just want to talk some shop, feel free to drop me a line: [email protected].
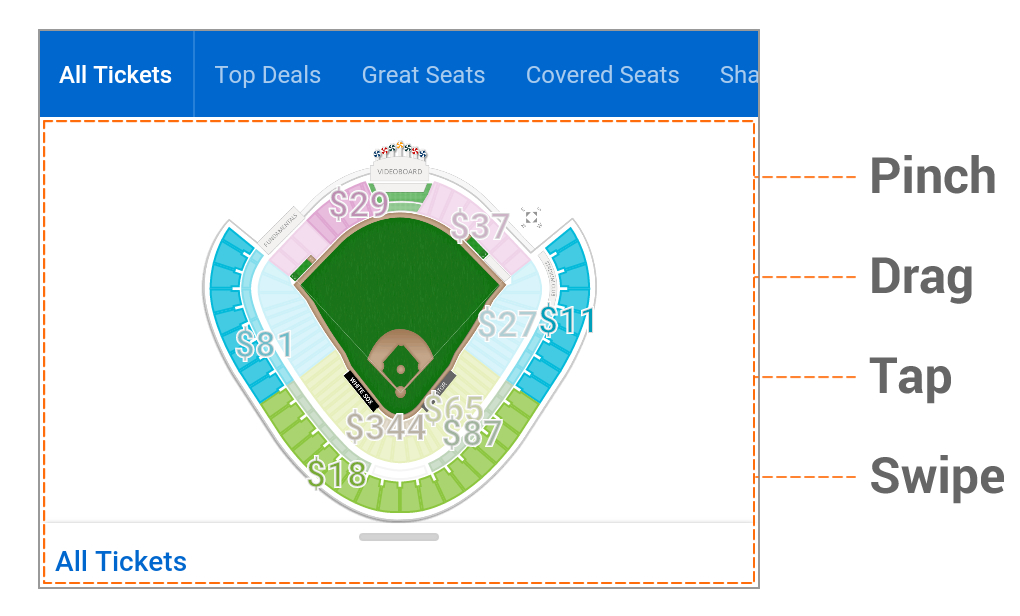
Layering Touches: Tap, Pinch, or Swipe Within the Same View
Beyond the basic interactivity of panning and zooming the map (which turned out to be not so easy as you may have read above), we knew we wanted to build a truly unique experience with the maps that provided users with something they couldn't find anywhere else. After looking for inspiration and discussing at the desk that sits in the center of the office (also known as the innovation station), we dreamed up the idea of allowing a user to swipe the map to reveal the different seating options.
Keith had found us an amazing swiper which was getting implemented across the project (you can read more about the Angular Swiper in Part 2 of this blog post series), and swiping is just such an instinctive and fun action to use on a mobile app that it had to be a part of our maps as well. But the ambition left us with a big challenge to overcome: How to differentiate between the actions and know what the user intended to do?
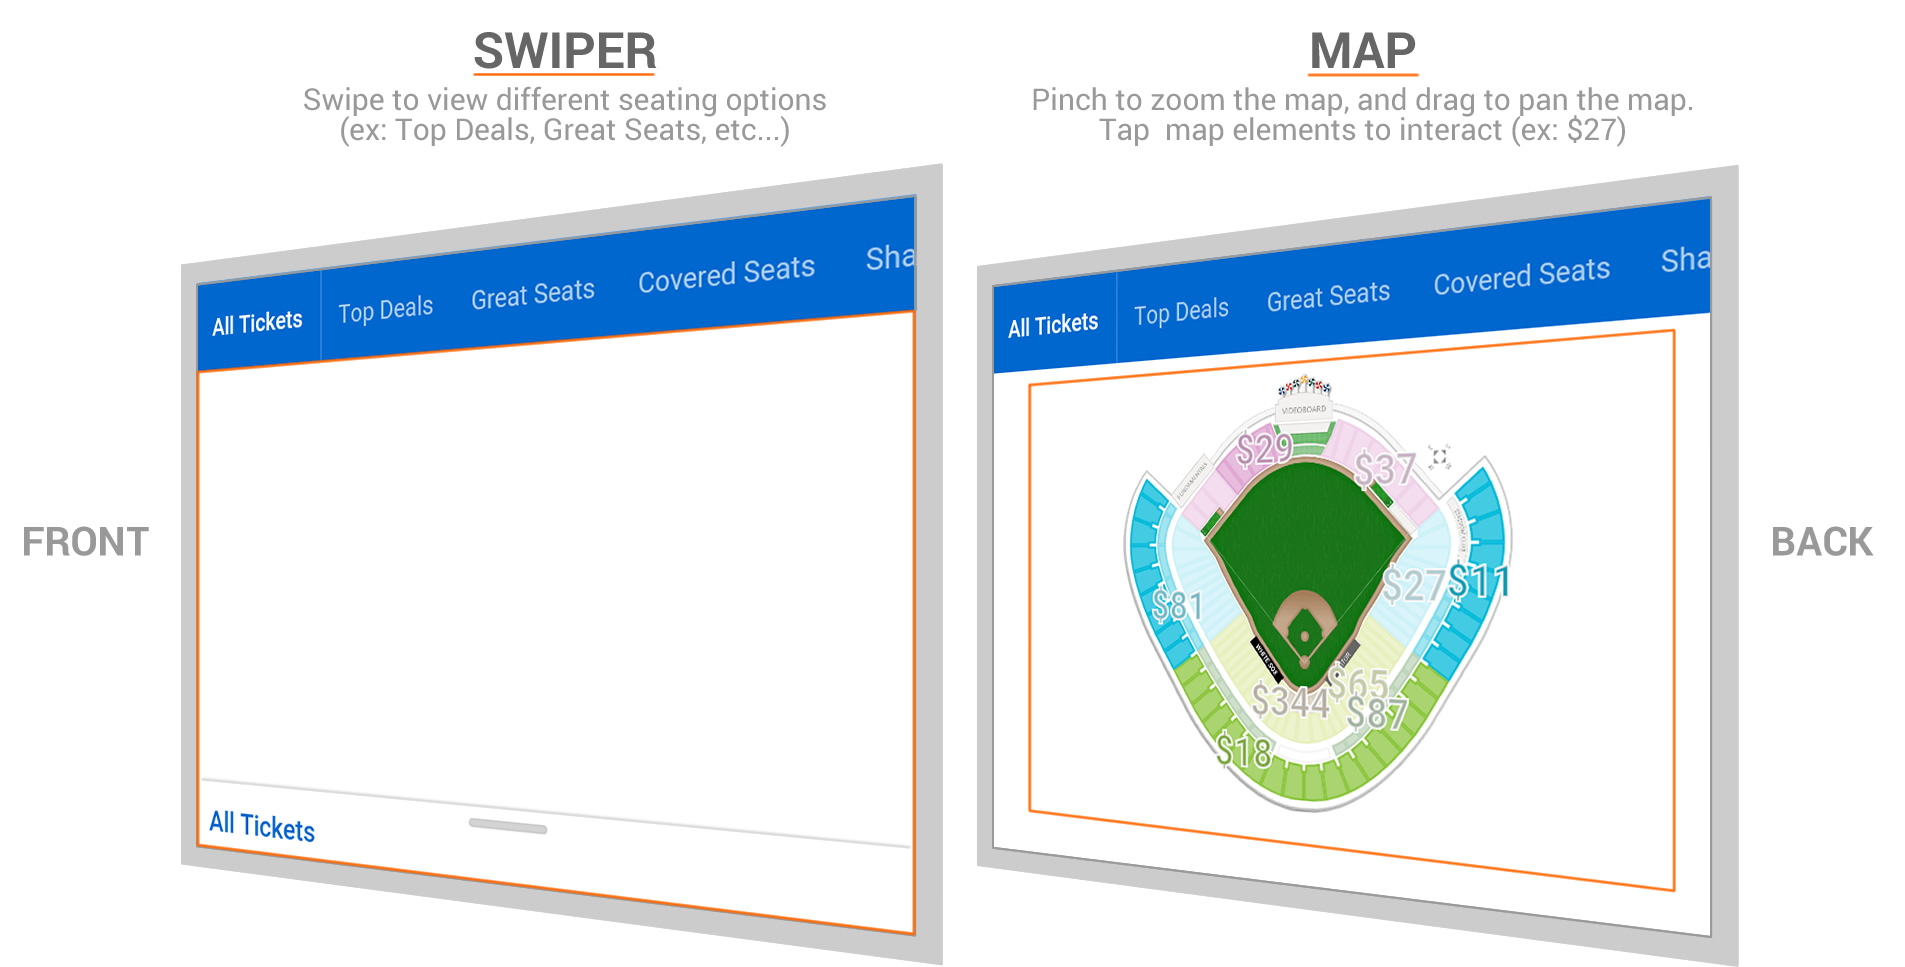
Adding a Swiper Above the Map
We already had our pinch, drag, and tap gestures built and functioning just as we wanted. The tricky part comes as we were now placing a swiper on top of the entire map element and in the very same position. We couldn't have different maps in each child element of the swiper as it created serious performance issues and entirely way too many bindings in the model. So our only option was to always have the same map in the background, place the swiper right on top, and have the controller facilitate the communication between the two.
Handling Pinch vs. Swipe
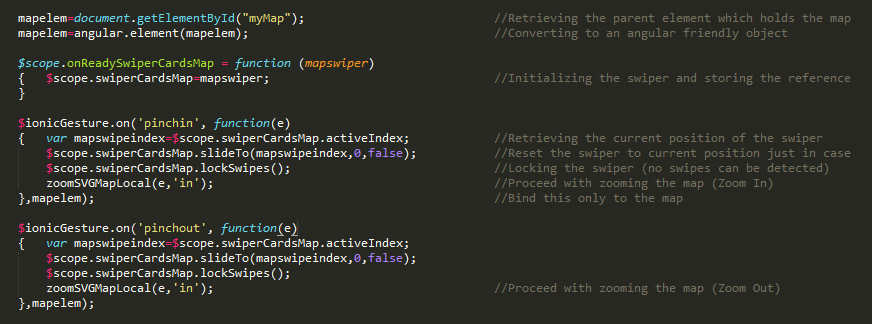
The first hurdle to overcome was pinching to zoom without triggering the start of a swipe. As soon as a pinch would begin our map zoomed as expected, but since the swiper element was now on top and detecting part of a horizontal touch movement, it also thought we were beginning to swipe. The solution here was to lock our swiper in its current place on the detection of a pinch, and to not unlock it until our pinch was deemed to be completed.
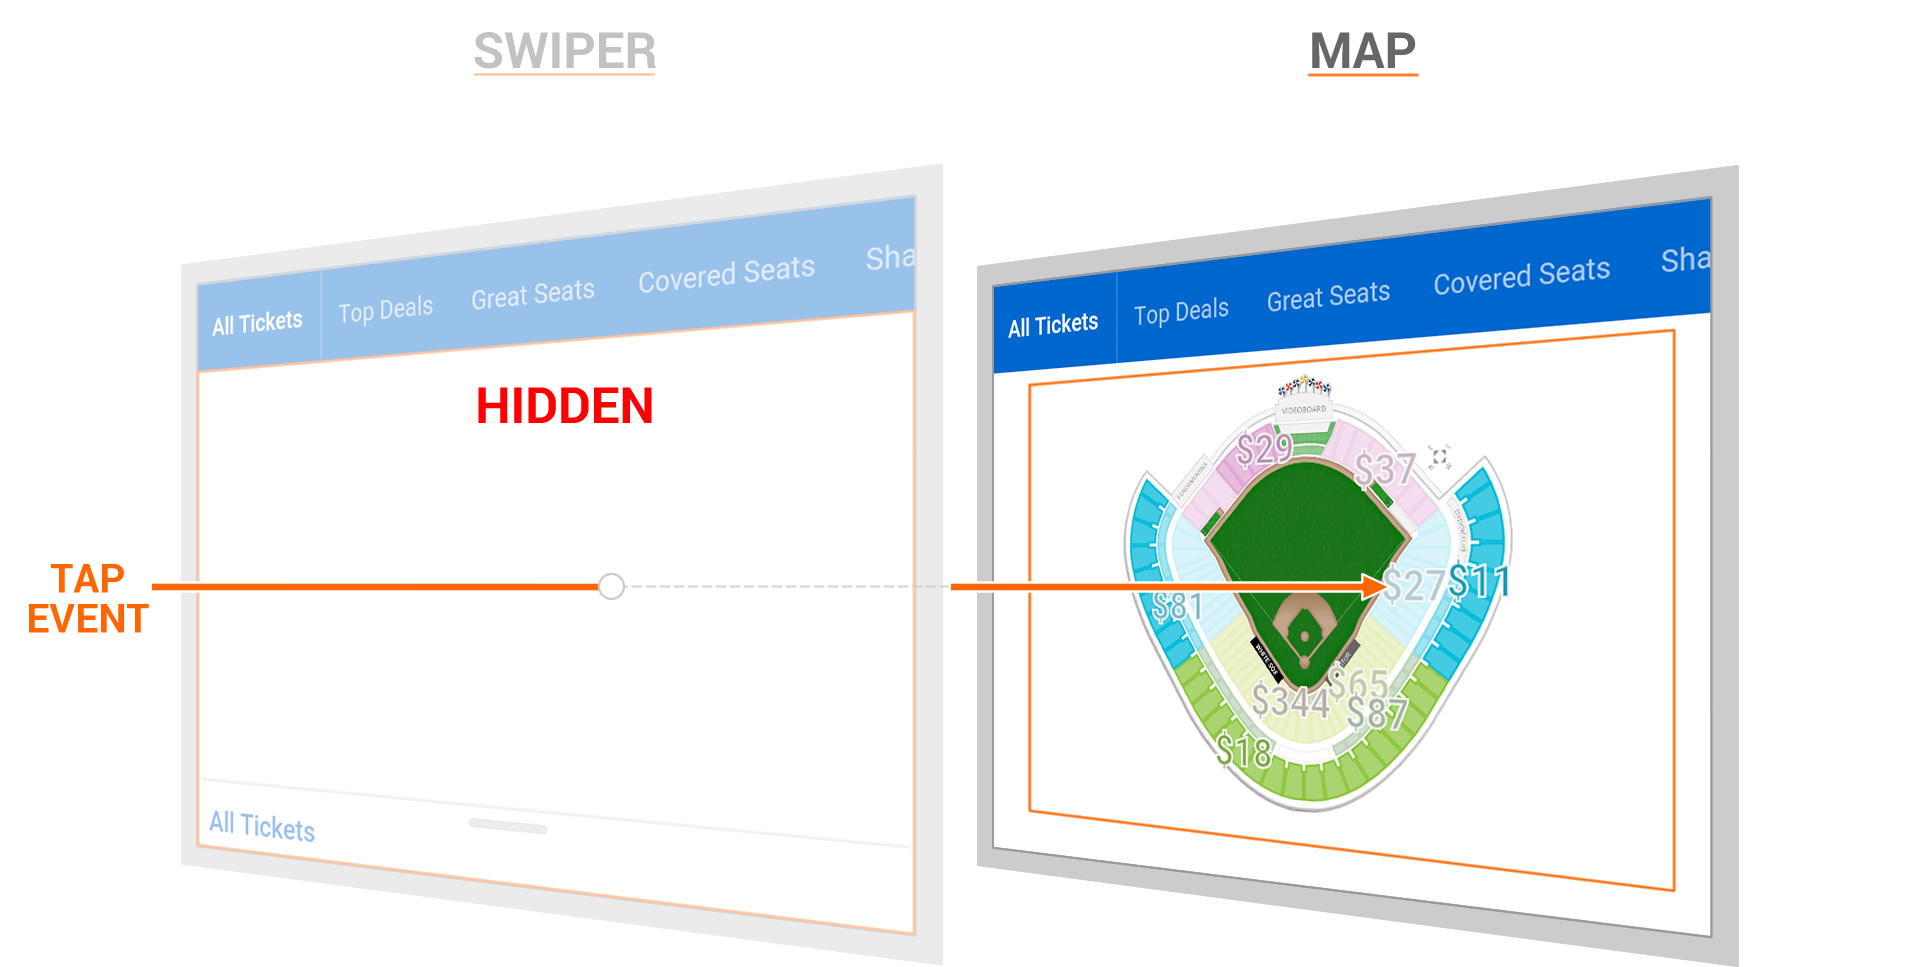
Tapping Through to the Bottom Layer
The more formidable task though was how to carry a tap through the swiper, and on to our map which lies beneath the swiper. Our map elements already had their tap events bound, but they for some reason would not receive them properly with the swiper resting on top. This wasn't an issue of distinguishing gestures between one another, and instead was a challenge on how could we capture the tap event, remove the swiper temporarily, and then re-trigger the same tap event to see where the click was intended.
Simulating Touches at a Specified Position
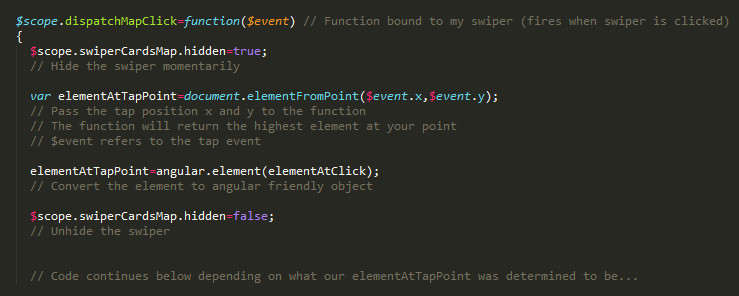
Hours of research and testing potential solutions finally yielded what I was looking for: document.elementFromPoint(x,y). There isn't a ton of documentation on this JS function, but it is pretty simple to implement and will return the outermost element at the X and Y position which you send to the function.
So I was now in business - I could capture the event by listening for a tap of the swiper, hide the swiper momentarily, and then find out where the tap would have landed by sending the X and Y coordinate values of the tap event to the document.elementFromPoint function. Important Note: Just be sure to unhide the swiper after all is said and done.
Distinguishing Swipe vs. Drag
The last of the gesture challenges to figure out was trying to determine a swipe versus a drag. Both can result from a very similar horizontal action, making it near impossible to distinguish one from the other. We played around with locking the swiper at all times, and then using the direction and speed of a drag to determine whether it was fast enough to then trigger a swipe manually. Performance was far from optimal and also confusing at times.
Thankfully, we realized that dragging only makes sense for the user when zoomed in and exploring the map, while the swipe was most valuable when viewing the entire map and wanting to swipe over to a different seating option. Therefore we were able to avoid this conflict by locking the swiper and enabling the dragging only when the map had been zoomed in, and unlocking the swiper while disabling dragging when the map was fully zoomed out.
Customized Browser - Inside the App
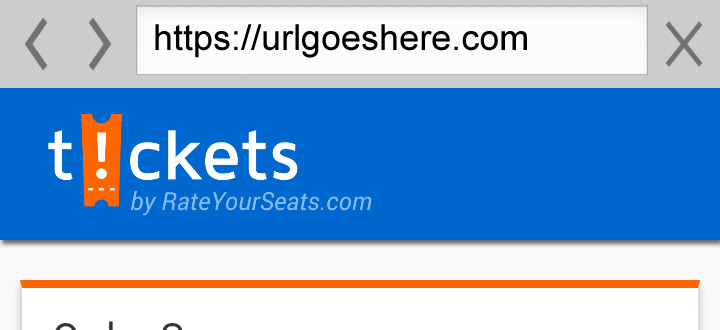
In order to allow a user to progress through a secure checkout process and complete a transaction, we knew that we would have to implement a browser session to handle the final purchase. The first option in accomplishing this would be linking out to the checkout page via the user's default browser. The advantages to this approach were clear: quick and easy to build for us as developers. But when we thought about this from a user experience standpoint, we realized it couldn't end up being our final solution. Opening the browser in a separate view would just feel clumsy and far from confidence inspiring during the purchase process, not to mention that it could be difficult to get back to the app.
Cordova Plug-In: ngInAppBrowser
The alternative option for addressing the checkout was to implement a browser right there inside the app. We had stumbled across some references to this approach during the course of our build, and decided to give it a shot using a Cordova plug-in named ngInAppBrowser ( Official Documentation, Easy to Follow Example).
Testing the In-App Browser
Installing the plug-in and building it into our code was the easy part, but we were not seeing the desired result when it came to testing on a desktop using Chrome Dev Tools (instead of a browser inside the app, a new chrome tab was handling the url request). Thinking it might not work as intended unless being run on a mobile device, we uploaded the app to our Ionic View account, but again had no success there. The last attempt was to load the app directly to a phone using the ionic run command, and thankfully the in-app browser was then working as it had been advertised.

In the hopes that it helps save others from some headache and stress, we just wanted to point this out - always test the in-app browser by running the app natively from the phone (iOS testing can be a bit trickier: Ionic Framework - Testing Guide).
Limited Styling Options With ngInAppBrowser
We finally got the plug-in to work, but quickly became disenchanted with the overall appearance of the browser which was now running inside of the app. There are a few options available to customize the browser (show/hide the location bar, use the OS back button to navigate the browser history), however the custom options also differed between Android and iOS. In the end, the plug-in fell short of providing the ultimate look, feel, and functionality we were hoping for at such a critical point in the app.
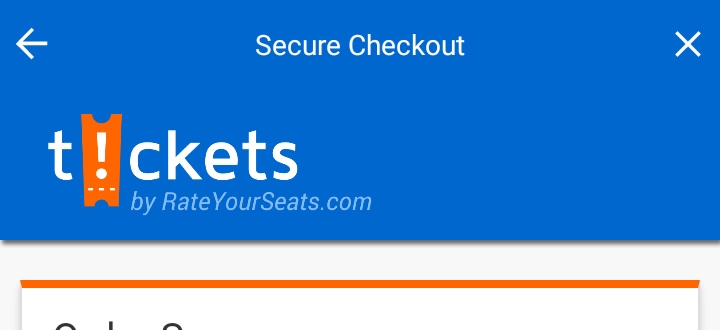
A Beautiful Cross Platform Solution
Back to researching the message boards we went, and were fortunate to come across another plug-in that would end up being just what we needed: themeablebrowser. The new plugin allowed us to control the background color for the status bar, insert a custom title in place of the location bar, and also add in our own icons for controlling the back and close actions. Overall it was a big win for creating consistency across the app, and was a dramatic improvement over what we were able to accomplish with ngInAppBrowser.
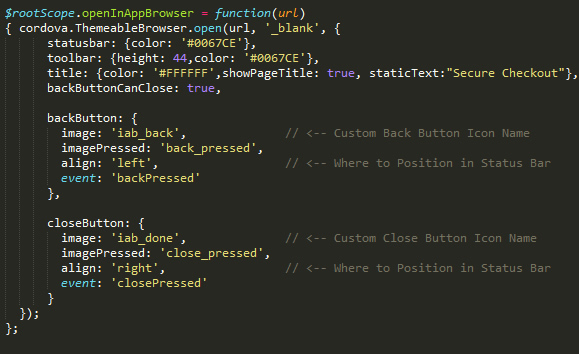
Simple Yet Highly Effective
The themeablebrowser code itself is very easy to implement, especially as we were aiming to keep it simple with just two custom icons and our own title:
Custom Icons and Native Images
If you are new to app development like we were and are looking to use custom icons within the themeablebrowser plug-in, be sure to read the section of the documentation on Importing Native Images. The process is very simple for Android, however iOS has a few more hoops to jump through.
Continue Reading
Part 1: Native vs. Hybrid and Choosing Ionic
Part 2: Horizontal Lists, List Performance, Animations and Profiling
----
We'd love to hear your feedback on this post and your experience developing hybrid mobile applications! Please use the comments or send us an email to communicate with us.
Finally, please download the T!ckets app! Not only is the best way to search, compare and buy tickets - on your phone - it will really help to contextualize this post. The app is available in the App Store and on Google Play.